HOW TO CREATE DATA SOURCE PARAMETERS IN POWER BI
Parameters allow developers to create dynamic connection strings, enabling flexibility in connecting to different data sources or environments. In this blog, we will see how to use data source parameters in Power BI. It also includes a step-by-step exercise for practice.
BENEFITS OF USING DATA PARAMETERS IN POWER BI
Data source parameters provide the following advantages:
- Creation of dynamic connection strings, enabling flexibility in connecting to different data sources or environments.
- Parameters make it easier to manage and maintain Power BI reports. Developers can centralize connection details, making updates more efficient.
- Reports become reusable across different environments, such as, Dev, QA and Prod.
STEPS TO CREATE DATA SOURCE PARAMETERS IN POWER BI
The steps to create and utilize data source parameters in Power BI are:
- Load the required data.
- Navigate to Query editor and create a new parameter by navigating to Hometab and then Manage Parameters.
- In the Manage Parameters box, provide the name of the parameter, Type, Suggested Values and Current Value.
- Replace the hard-coded path in the Advance Editor code with the parameter name.
- Select the parameter and the data source connection will change based on the selected parameter value.
EXERCISE: CREATE A DATA SOURCE PARAMETER TO CONNECT TO DIFFERENT EXCEL FILES.
In the example below, we will create three folders and XLS files within each of these folders. We will connect to these files in Power BI based on parameter selection.
To illustrate this concept, I have created three folders in my C:\ drive: Dev, QA, and Prod. Each of these folders contains an Excel file named CustomerData.xls.
It has only two columns: CustomerName and Sales. The data differs in the three files. The structure of the XLS in Dev, QA, and Prod folders is shown below:

The structure of the file is same, but the data varies.
Now, follow the steps below:
- Launch Power BI desktop and load the CustomerData.XLS from the Devfolder. Learn how to connect Excel datasource in Power BI.
- Select Transform Data to navigate to the Query Editor. The data preview will display CustomerName as Dev as we are connected to the XLS in the Dev folder.
- From the menu, click on the Advanced Editor; it will display the text as follows:
let
Source = Excel.Workbook(File.Contents("C:\PowerBI_Blogs\Dev\CustomerData.xlsx"), null, true),
Data_Sheet = Source{[Item="Data",Kind="Sheet"]}[Data],
#"Promoted Headers" = Table.PromoteHeaders(Data_Sheet, [PromoteAllScalars=true]),
#"Changed Type" = Table.TransformColumnTypes(#"Promoted Headers",{{"CustomerName", type text}, {"Sales", Int64.Type}})
in
#"Changed Type"
It displays the current file path as C:\PowerBI_Blogs\Dev\CustomerData.xlsx, which is the location where I have saved my XLS file.
Our objective is to replace this path with the parameter.
- Create a parameter.
From the Home tab, select Manage Parameters and then select New Parameter.
Provide the following inputs in the Manage Parameters box.
- Name. Provide a name of the parameter.
- Type. This is the type of the parameter. In this case it will be Text.
- Suggested Values. It should be list of values, as we will be providing the values as Dev, QA, and Prod.
- Default Value. Select the default value from the drop-down which you wish to provide to the parameter.
- Current Value. Select the value from the dropdown.

- Change the Advance Editor code.
Click on the Advanced Editor and change the hard-coded path with the parameter as shown below:
C:\PowerBI_Blogs\”& SourceParam &”\CustomerData.xlsx”)
the ampersand (&) symbols is used for the concatenation.
The new Advanced Editor code (with the parameter) will look like the following:
let
Source = Excel.Workbook(File.Contents("C:\PowerBI_Blogs\"& SourceParam &"\CustomerData.xlsx"), null, true),
Data_Sheet = Source{[Item="Data",Kind="Sheet"]}[Data],
#"Promoted Headers" = Table.PromoteHeaders(Data_Sheet, [PromoteAllScalars=true]),
#"Changed Type" = Table.TransformColumnTypes(#"Promoted Headers",{{"CustomerName", type text}, {"Sales", Int64.Type}})
in
#"Changed Type"
- Now, changing the parameter value will display the data from the respective folder.
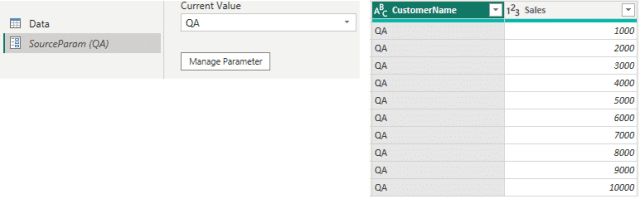
Selecting QA from the parameter, displays the file from the QA folder.

Chandraish Sinha is the founder and President of Ohio Computer Academy, a company dedicated to providing IT education. An enthusiastic IT trainer, Chandraish embodies his company’s motto: Inspire, Educate & Evolve.
He has 20+ years of experience in Information Technology. He is an accomplished author and has published 11 books covering Business Intelligence related topics such as, Tableau, Power BI and Qlik. Checkout his Amazon Author profile.
His latest book Excel Basics to Advanced covers all the aspects of MS Excel and provides exercises for self-learning.
Similarly, his recent book, Dashboarding with Tableau, covers all the features in Tableau and includes exercises for self-learning.
He has implemented IT solutions in various domains viz. Pharmaceutical, Healthcare, Telecom, Financial and Retail.
He blogs regularly on various IT topics. Check them out in the links given below: